此网站部署在阿里云服务器 ECS 上,使用运行在 LNMP 环境下的 WordPress。由于阿里云帮助中心仅提供了在 CentOS 部署 LNMP 环境和搭建 WordPress 的过程,搜索到的若干在 Debian 搭建的过程总有部分步骤与实际不一致(可能是 LNMP 版本不同导致的),所以在这里梳理一下整个过程,并特别提示可能出现的问题与解决方法。
以下内容参照阿里云帮助中心的文档,列出在阿里云服务器 ECS 创建的 Debian 10.10 实例中部署 nginx、MySQL 和 PHP,并搭建 WordPress 网站的过程。另有使用域名访问网站的说明,该部分较耗时,且与服务器操作不存在先后关系,可提早进行。
This website is deployed on Aliyun Elastic Cloud Server (ECS), running WordPress under LNMP (Linux-nginx-MySQL-PHP) environment. Since Aliyun Help Center provides only the process of deploying LNMP environment (in Chinese) and setting up WordPress (in Chinese) on CentOS, and the search results for those on Debian are more or less inconsistent with the actual environment (which may be caused by the different versions of LNMP), this post is aimed at clarifying the complete process, and reminding possible problems and their solutions.
The following content is organised with the documents in Aliyun Help Center, lists the process of deploying nginx, MySQL, and PHP in the Debian 10.10 entity created on Aliyun ECS, and setting up WordPress-powered website. The follow-up instruction is in the post “Visit WordPress website using domain names”, which is time-consuming and is not in sequence of this post, hence could be carried out earlier.
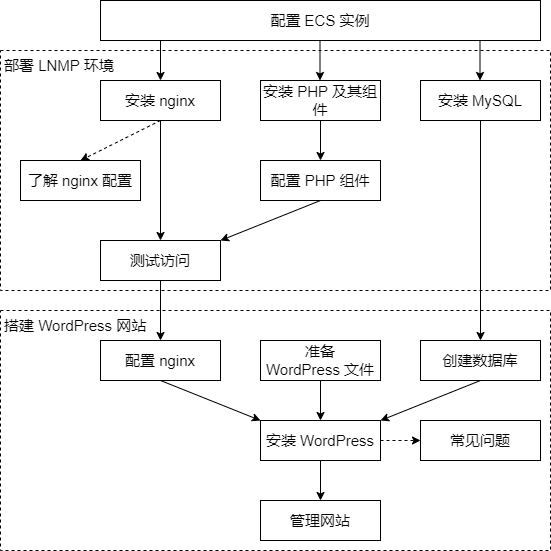
部署 LNMP 环境 / Deploying LNMP environment
配置 ECS 实例 / Configuring ECS entity
创建的 Debian 实例已被分配公网 IP 地址,需在安全组中检查是否已放行 HTTP(80)和 SSH(22)端口。若未放行 SSH 端口,也可仅通过控制台的“远程连接”功能完成全部操作。这里最终搭建的网站仅使用 HTTP 连接,因此可不放行 HTTPS(443)端口。
这里选择通过 Windows Terminal 在命令行(Command Prompt)下使用 ssh 命令连接到服务器的具有 sudo 权限的非 root 用户(也可使用任何自己熟悉的方式),需注意 Windows Terminal 中 Ctrl+C 等快捷键的作用与其他工具(如使用 cmd 启动的命令行或其他 SSH 工具)不同。以下不特别提示是否使用管理员权限。
检查防火墙状态(systemctl status ufw),关闭在运行的防火墙。(该 Debian 实例中并未安装防火墙 ufw,可跳过此步骤。)
安装 nginx / Installing nginx
该 Debian 实例使用的软件源中不包含 nginx,这里参照 nginx.org 中提供的方法添加 nginx 源并安装,该方法适用于 Debian 的不同版本,且添加的是第三方源(写入 sources.list.d 目录),是较繁琐但值得推荐的工整的操作方法,可根据实际情况自行调整。另外,也可使用 docs.nginx.com 中提供的方法。
这里安装的是 nginx 1.14.2,配置信息位于 /etc/nginx/(使用 sudo nginx -t 查看),安装完成后即已在运行(使用 systemctl status nginx 查看)。此时已可通过 IP 地址访问,所展示的页面是在 /etc/nginx/sites-enabled/default 文件中配置的 /var/www/html/index.nginx-debian.html 。
安装 MySQL / Installing MySQL
该 Debian 实例使用的软件源中不包含 MySQL。在 MySQL 网站的社区版下载页面打开 APT 仓库链接,点击下载按钮并在新页面中复制下载链接,在服务器中使用 wget 下载,使用 dpkg -i 或 apt install 安装,期间注意选择“MySQL Server & Cluster”项作为要安装的 MySQL 产品。该软件包仅用于添加软件源,之后还需更新软件包列表(sudo apt update)并安装 mysql-server,期间可在“Select default authentication plugin”窗口中选择“Use Legacy Authentication Method”项(非必需)。若选择推荐项“Use Strong Password Encryption”,则可能导致 WordPress 无法操作 MySQL 数据库,或后续通过其他方式修正。安装过程中可暂不设置 root 密码。
这里安装的是 MySQL 8.0.27(使用 mysql -V 查看)。安装完成后即已在运行,此时执行 mysql_secure_installation 命令并按提示响应(选择密码验证策略、设置 root 密码等)。
安装 PHP 及其组件 / Installing PHP and its components
从 Debian 的软件源中至少安装 php-mysql、php-fpm 和 php-gd,其中 PHP FPM 的 fastCGI 进程管理器作为 nginx 处理 PHP 文件的服务,PHP GD 用于图片处理。
这里安装的是 php 7.3.31。需要注意 PHP FPM 对应的服务名为 php7.3-fpm,配置信息位于 /etc/php/7.3/fpm/ 。
注:WordPress Hosting Handbook 中给出了推荐的 PHP 扩展,且后续在 WordPress 面板「Tools→Site Health」中会列出建议启用的扩展。在某些情况下,缺少部分推荐扩展可能导致严重错误,如在启用 SSL 时需安装 curl 以避免出现连接错误。因此,可考虑再安装 curl、imagick、mbstring、zip 和 intl。在 Debian 10 中,这些软件包的名称有“php-”前缀,即应安装 php-curl、php-imagick 等。
了解 nginx 配置 / nginx configuration
转到 /etc/nginx/ 目录,其中的主配置文件为 nginx.conf,注意前几行的内容,并按实际情况修改。
user 为运行 Web 服务的用户,默认使用 Debian 中已有的 www-data 组下的已有的用户 www-data,若使用的用户名与组名不一致,该行应改为“user <user_name> <group_name>”的形式,否则将出现如下错误信息:
nginx [emerg] getgrnam("<some_name>")failed in /etc/nginx/nginx.conf:1worker_processes 为所使用的 CPU 的核数,默认使用 auto,也可修改为不超过服务器 CPU 核数的数字。
include 表示加载的模组配置文件,可有多行,需注意这些文件中已有的配置项不要在其他生效的配置文件中重复添加,否则将出现如下错误信息:
nginx [emerg] "<module_name>" directive is duplicate in /etc/nginx/<path-to-conf>:<line_num>配置有误时将无法重启 nginx,可使用 sudo nginx -t 查看错误信息并定位。
http 段有如下两行,表示 nginx 从这两个位置加载配置。
include /etc/nginx/conf.d/*.conf;
include /etc/nginx/sites-enabled/*;
相应地,实践中一般在 sites-available 目录中添加网站连接的配置文件,并通过符号链接添加到 sites-enabled 目录中(默认已添加了名为 default 的配置文件);或在 conf.d 目录中添加或修改 .conf 文件。这里待部署 WordPress 文件时再添加配置。
配置 PHP 组件 / Configuring PHP components
打开配置文件 /etc/php/7.3/fpm/pool.d/www.conf,修改如下内容:
user = <user_name>
group = <group_name>
listen.owner = <user_name>
listen.group = <group_name>
为避免使用中可能遇到的问题,可考虑修改 /etc/php/7.3/fpm/php.ini 的以下配置项:
upload_max_filesize = 2M	; 上传文件大小的上限
post_max_size = 8M	; HTTP POST 数据量的上限
memory_limit = 128M	; 脚本可用内存上限
重启 PHP FPM 服务(sudo systemctl restart php7.3-fpm)。
测试访问 / Testing website accessibility
此时可在 /var/www/html 目录中临时新建网页文件并输入以下内容:
<?php echo phpinfo(); ?>再通过浏览器访问,查看是否打开了该页面并显示了 PHP 配置信息。(此文件仅用于测试,不要保留。)
搭建 WordPress 网站 / Setting up WordPress website
创建数据库 / Creating database
使用 MySQL 的 root 用户登录(mysql -uroot -p),创建供 WordPress 使用的数据库(这里使用 wordpress 作为数据库名)和用户(这里使用 wordpress 作为用户名,密码为“WpPasswd”):
create database wordpress;
create
user 'wordpress'@'localhost' identified with mysql_native_password by 'WpPasswd';
注:在 MySQL 的 CLI 中可使用方向键调取历史命令,但不包括有明文密码的命令。
给新用户对所建数据库的权限并生效:
grant all privileges on wordpress.* to 'wordpress'@'localhost';
flush privileges;
exit;
需注意,所创建的 MySQL 用户及其密码之后将在配置文件中明文保存。
准备 WordPress 文件 / Preparing WordPress files
这里将 WordPress 部署在 /var/www/wordpress/html 目录,创建该目录并修改权限为 www-data 组中的用户(chown -R <user-name>:www-data <path>)。从 WordPress 的网站找到所提供的压缩包的地址(zip 格式:English (US),English (UK),中文(简体);tar.gz 格式略)并使用 wget 下载到本地。
解压后的文件位于 wordpress 子目录中,将其中的 wp-config-sample.php 文件复制到 wp-config.php,并作如下修改:
分别修改 DB_NAME、DB_USER、DB_PASSWORD 为将使用的 MySQL 数据库名、用户名和密码;使用 curl 获取或浏览器访问 WordPress 安全密钥生成页,并替换文件中的相应行。
配置 nginx / Configuring nginx
根据前面对 nginx 配置的说明,这里选择保留初始的 sites-available/default 文件,把它复制到 conf.d/wordpress.conf 并修改。
需注意,只能在一个生效的配置文件中 server 段的监听端口(listen)添加 default_server 标记,可在 default 文件或新添加文件中的保留。可参考文件中已有的注释和如下解释作修改:
server {
	listen 80 default_server;	# IPv4
	listen [::]:80 default_server;	# IPv6

	# WordPress 的安装位置
	root /var/www/wordpress/html/wordpress;

	index index.html index.htm index.php;	# 使用 PHP 时应添加 index.php

	server_name 127.0.0.1;	# 修改为云服务器的 IP 地址

	location / {
		try_files $uri $uri/ =404;
	}

	location ~ \.php$ {
		root /var/www/wordpress/html/wordpress;
		include snippets/fastcgi-php.conf;

		fastcgi_pass unix:/run/php/php7.3-fpm.sock;
		fastcgi_param SCRIPT_FILENAME $document_root$fastcgi_script_name;
		include fastcgi_params;
	}

	# 当在 WordPress 使用固定链接(建议使用固定链接)时,需添加以下内容
	if (-f $request_filename/index.html) {
		rewrite (.*) $1/index.html break;
	}
	if (-f $request_filename/index.php) {
		rewrite (.*) $1/index.php;
	}
	if (!-f $request_filename) {
		rewrite (.*) /index.php;
	}
}
修改完成后,确认 nginx 服务可正常重启。
安装 WordPress / Setting up WordPress
通过浏览器访问服务器 IP 地址,即可开始安装过程。之后可通过 /wp-login.php 登录并开始配置网站和撰写日志。
若在访问网站时提示出错而无法继续操作,可在 wp-config.php 文件中修改 WP_DEBUG 为 true,或修改其他用于调试的变量(各变量含义参见文件中的注释,或查看文档)。之后以相应的方式操作,查看详细的错误信息。(问题解决后记得改回 false。)
访问网站时若提示“Error establishing a database connection”,需检查 wp-config.php 文件中连接数据库的相关设置是否正确,并确认所使用的 MySQL 用户(这里的用户是 wordpress)使用的是旧的(MySQL 5.0 之前的)密码验证机制:
select plugin from mysql.user where user = 'wordpress';若为 caching_sha2_password,则表示在安装 MySQL 时选择了增强密码加密方法,此时可考虑修改该用户的密码加密方法:
alter user 'wordpress'@'localhost' identified with mysql_native_password by 'WpPasswd';
flush privileges;
其他常见问题 / Other common problems
若在安装插件或更新 WordPress 时提示 FTP 错误,如“Update Failed: Could not create directory.”、“Plugins installation failed: Could not copy file.”等,则表示 WordPress 所在目录的存在权限问题,可修改 wp-config.php 文件中如下内容:
define( 'FS_METHOD', 'direct' );
define( 'FS_CHMOD_DIR', 0777 );
define( 'FS_CHMOD_FILE', 0777 );
管理网站 / Managing website
可在 WordPress 面板(Dashboard)的「设置(Settings)→常规(General Settings)→站点语言(Site Language)」中添加并使用新的语言,该操作将向 WordPress 安装位置的 wp-content/languages 目录添加翻译文件,影响后台和网站的显示语言。其作用机制为使用 PHP 的 esc_html__() 等函数从翻译文件中检索并返回目标语言的字符串(如有)。
伪静态设置有助于搜索引擎的收录,所以推荐修改页面的链接格式,而不使用默认的 /?p=%post_id% 形式。打开「设置(Settings)→固定链接(Permalink Settings)」,选择其他形式或自定义样式。这里使用的是自定义的 /%category%/%postname% ,当添加新日志时设置 URL 别名(URL Slug)为“my-first-post”、选择的分类(category)为“计算机 / CS”(别名(slug)为“cs”)时,发布后访问它的链接片段为 /cs/my-first-post。
此外,安装插件应谨慎。未做好与所用 WordPress 版本适配的插件很可能给网站展示或后台操作造成奇怪的、甚至无法挽回的影响;启用过多插件很容易拖慢后台服务的运行;未经过大量检验的插件可能含有恶意代码,或占用大量磁盘空间。
Leave a Reply